SoapUI Tutorial Part 4 : Effectively using JDBC connections and databases in SoapUI
- khyati sehgal
- Jul 18, 2014
- 2 min read

In today’s world, if you are a tester, QA, developer, or UI developer, you can not escape from data. Data is everywhere on the web , in real life, on our computer, in mobile phones, in Television, in books, in files, in banks, everywhere. And as data is getting increased storing them has also become a crucial topic to discuss.
We have seen many companies running so as to manage data from various tools and techniques like Hadoop, Big Data, etc.

How to manage various databases in SoapUI?
soapUI provides a way via which you can add different types of databases in your project. And further use them in your tests. SoapUI provides support for multiple databases like Postgres,db2, Mysql, Oracle, Sybase, etc.
Pre-requisite
You need to download jars for the database you want to work with.

And then you have to place that jar to the ext folder of SoapUI {\SmartBear\SoapUI-Pro-5.0.0\bin\ext}.Once this is done then only you can avail of all the services of the SoapUI JDBC connection.
Adding JDBC connection
Double click on your project.
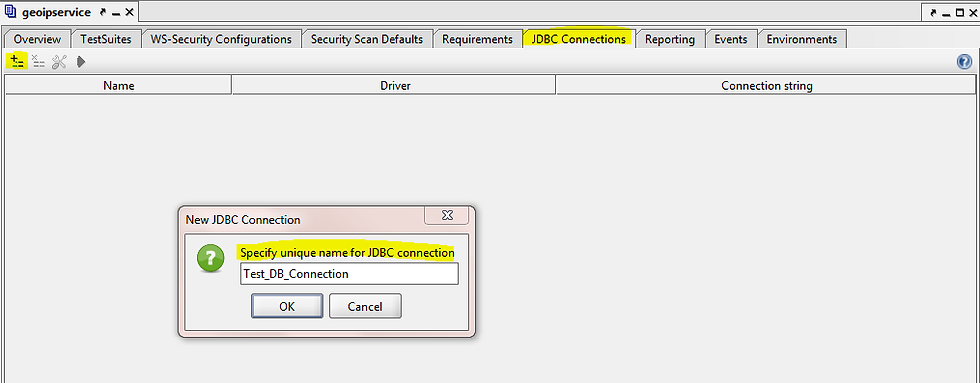
You can see different tabs in the editor section, click on the JDBC Connection tab.

And then click on the first icon of ‘+’, via this you can add new database connection in your project. Once you click on this a new window will pop-up where-in you can give a logical name of your database connection.
Next, you have to mention further details of the connection you want to connect with, like
Driver name
User name
Password
Database connection string

And henceforth the Test Connection button will get enable and you can test your connection whether the connection is successfully made or not. Before that make sure you have gone through the checklist :
The driver is added successfully at the correct position
You have restarted SoapUI, after the addition of the driver.
If you are working with local databases then database service is up and running.
You have selected the right driver in the SoapUi window.
Once this is done, you can execute different queries in your project and play around with the world of databases.


Comments